The first three photos show the basic shape of an ama. It is made of polyisocyanurate foam (which is expensive but doesnt dissolve on contact with polyester resin like styrofoam would), cut with a saw and shaped with planing tools and coarse sandpaper. The foam is two sheets glued together and glued to a plywood backbone which was precut to the right shape, and gives a consistent form and stiffness to the mould. Without the plywood spine it never would have come out symmetrical.
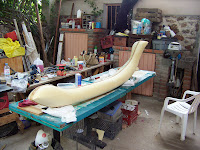


The next photo shows the fibreglass ( a single layer of matte) as it is cut and laid on before adding the resin. The fibreglass and resin are bonded to the foam and this forms the outer layer of the mould (middle picture). Then the foam is carefully cut away from the plywood spine.


After the foam is separated from the spine, it is mounted on a couple of posts, and wrapped with plastic film, of the type you wrap leftovers in. Now is it ready for the thick fibreglass layer: two layers of matte sandwiching a layer of woven roving. The fibreglass will not stick to the mould because of the layers of plastic film. You could use mould release wax, but I didn't have any.


Once I made the first fibreglass cast, I had to grind it off at the ends so it would open enough to remove it. Then I put it back in place and shipped it to Chetumal, near the border with Belize. There it would wait for me to carry it across the border.
Once I was in Belize, I took the bus up to the border and dropped in on my friends Rolando and Mercedes. They were storing it for me, and kindly took me in overnight. The next morning Rolando drove me to the border. I walked across the Rio Hondo bridge into Belize and went to Customs and Immigration. The Customs officers didnt know how much to rob me in duty for this strange-looking object. They base their "duty" on the market value, plus the cost of shipping and insuring the object. The shipping cost was typed on the waybill. It said $845. So they assumed that was in US dollars. I told them that was pesos (it was), and they finally believed me when I explained that the sign for pesos is not found on a keyboard, so they use the $ sign. So when they finally tallied up their estimate they charge 20%, then taxes on their fee (!). It all came to almost $100us. For a chunk of foam and fibreglass that I made myself. So I left the Customs office and started walking to Corozal, a distance of about 20 miles. Of course the second pickup truck that passed by stopped for me and I rode in the back until I saw the bus station. I was concerned about the awkwardness of taking the ama on the bus but it fit right under the seats – the buses here are all old Bluebird school buses, totally unmodified. The rest is uneventful.
When I got to Dangriga I moved into the new guides house. Every year it is a different place, because they only rent it for a few months and have to take what they can get. This year it is the top floor of a two-storey concrete house at the south edge of town, right up against the mangroves (and sandflies).

This isnt it. But it is our immediate neighbour to the west. This picture was taken from the roof, which is accessible and has a rail all around, as you will see.

The first picture is the Manatee on the roof before I got the sawhorses built. After the sawhorses were built, I began work on the daggerboard trunk. On the right you can see the opening in the hull for the daggerboard (a hinged keel: more like a jackknife than a dagger). In the centre picture the dagger board is barely visible sticking up through the opening. I like this picture because it shows how sleek this boat is.
On the left is a better view of the daggerboard, which is an old rudder salvaged off a wrecked Hobiecat, found out at Half Moon Caye. Above the boat is the framework for a shade. I only set the tarp up when I am going to work on the boat. Otherwise the wind beats it up and pulls the poles all apart.


The photo on the right shows the trunk: the box in which the dagger board is housed. Also evident in this picture are the two bulkheads with large hatches cut into them.
Just working on this section made me realise I am not getting this boat done this year; especially since I spent the bulk of my time off vacationing with Lorena, which I don’t regret in the least.
So thats my progress so far, folks. Next posting will come in a week or two. I have to rustle up some photos from some of my guests first. Cheers, Jack

Hi, Jack! Good to see you and Lorena are still green side up - nice boat pics, by the way. Can't wait to see how it all turns out! Am starting to plan the summers adventures, both paddling and family stuff - if only I can make the "work" part squeeze into the gaps - wish me luck!
ReplyDeletexxoo
Hi again Jack. You help yourself to any photos you like. And as far as you vacationing too much with Lorena, I am thankful both of you were along on mine. Looking forward to the next post.
ReplyDeletePadlsafe